
PEAK CARES
EMAIL SUPPORT
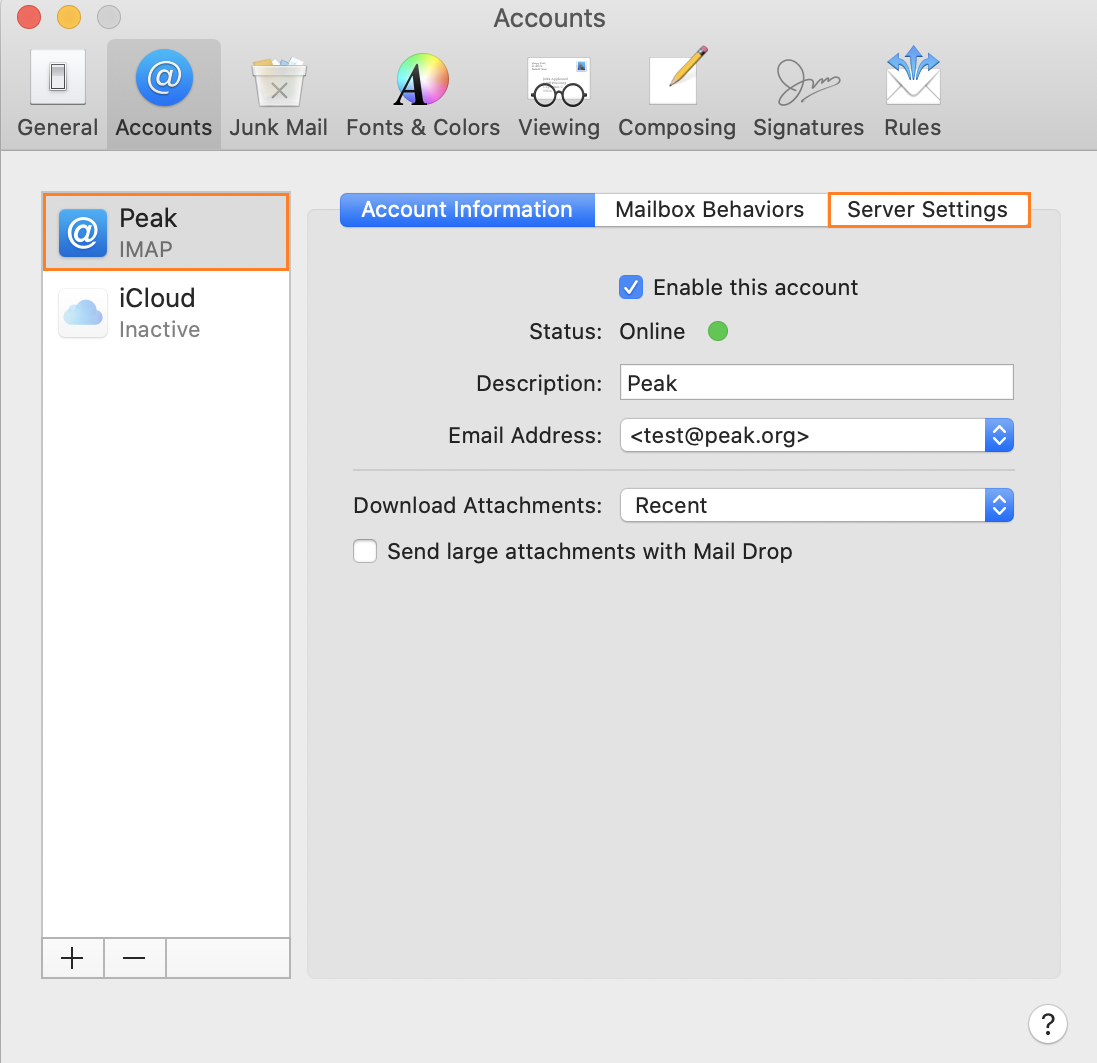
Mail Client Settings
Your Server/Host will change depending on what your email address is. If your email address is support@peak.org, then your Server/Host will be mail.peak.org.
| Server/Host | Protocol | Port | SSL/TLS | SPA |
|---|---|---|---|---|
| mail.domain.tld | POP3 | 995 | Required | No |
| mail.domain.tld | IMAP | 993 | required | No |
| mail.domain.tld | POP3 | 110 | None | No |
| mail.domain.tld | IMAP | 143 | None | No |
| mail.domain.tld | SMTP | 587 | STARTTLS | No |
| mail.domain.tld | SMTP | 465 | SSL | No |
| mail.domain.tld | SMTP | 25 | None | No |
Depending on what your email address is, your Server/Host domain should match the domain of your email address, it should be one of the following:
| mail.99west.com mail.actionnet.net mail.casco.net mail.cascocom.com mail.cmug.com mail.continet.com mail.dnc.net mail.dswebnet.com mail.efn.org mail.epud.net mail.flashmail.com |
mail.magick.net mail.newportnet.com mail.nu-world.com mail.oregonisonline.com mail.oregonnet.com mail.pacwest.net mail.peak.org mail.peaksky.com mail.pioneer.net mail.wizzards.net mail.wmni.net |
Thunderbird Settings
Thunderbird can be downloaded here.
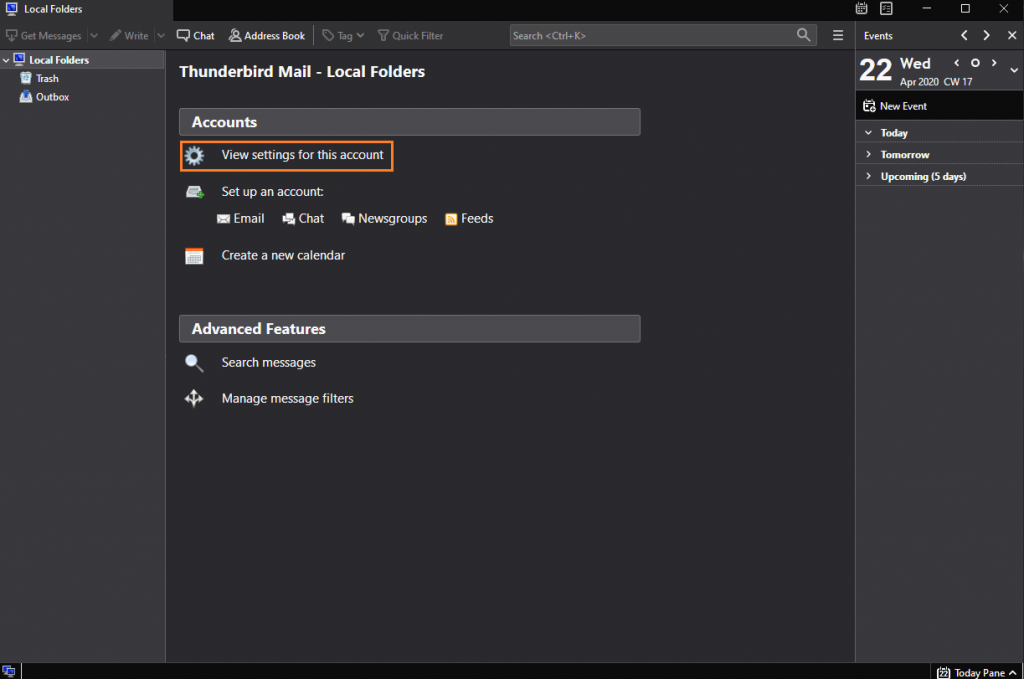
After opening Thunderbird, select the email account you wish to edit from the folder bar.
Click the View settings for this account button.
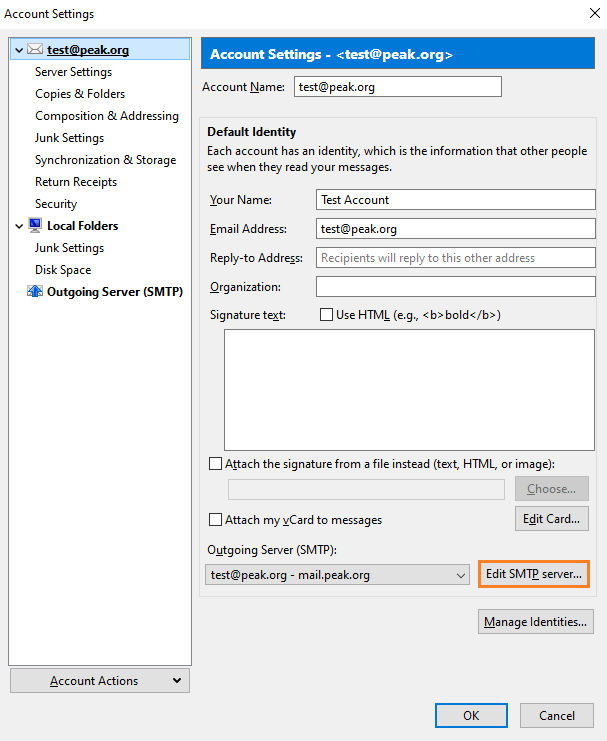
We’re going to check the outgoing settings first.
Click the Edit SMTP Server button.
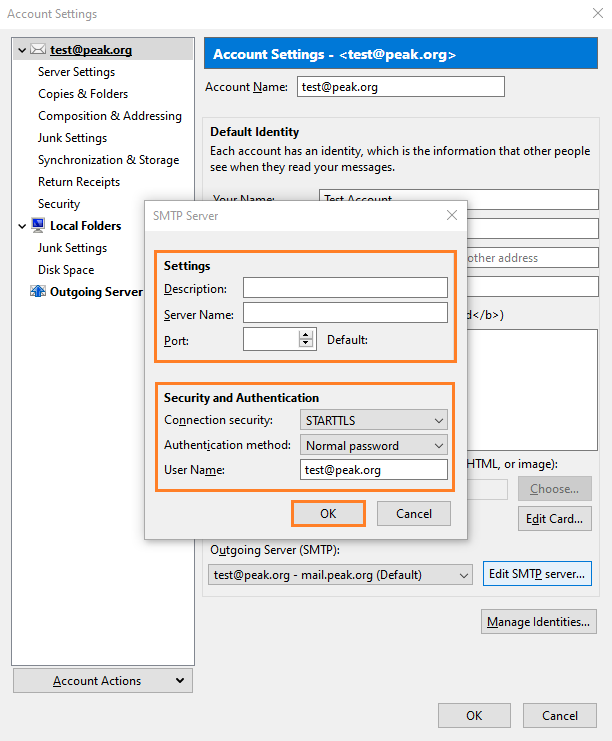
Update your outgoing settings.
Server Name: mail.peak.org
Port: 587
Connection Security: STARTLS
Authentication Method: Normal password
User Name: your entire email address
Click the OK button.

Select Server Settings from the menu on the left to update and confirm the incoming settings.
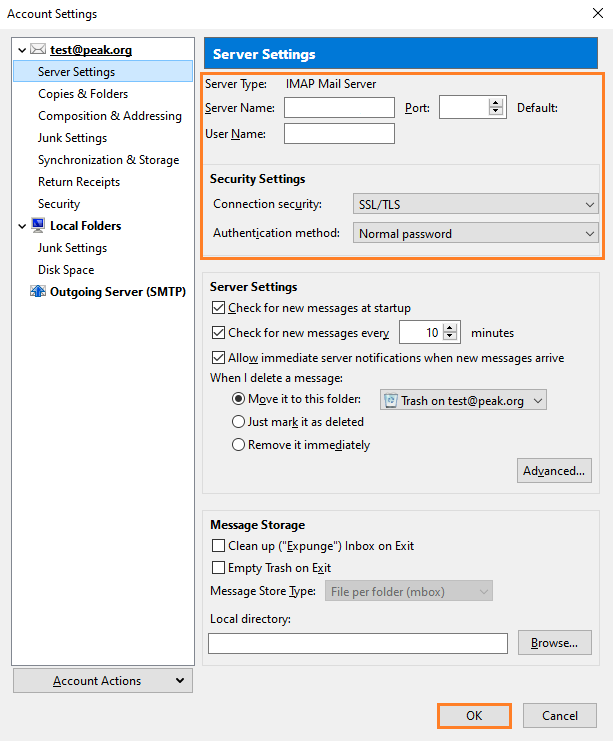
Do not switch from POP to IMAP without backing up your email. If you want to make this change, call our Technical Support for help.
Server Name: mail.peak.org
User Name: your entire email address
Port:
IMAP: 993
POP: 995
Connection Security: SSL/TLS
Authentication method: Normal password
Press the OK button.
Outlook Settings
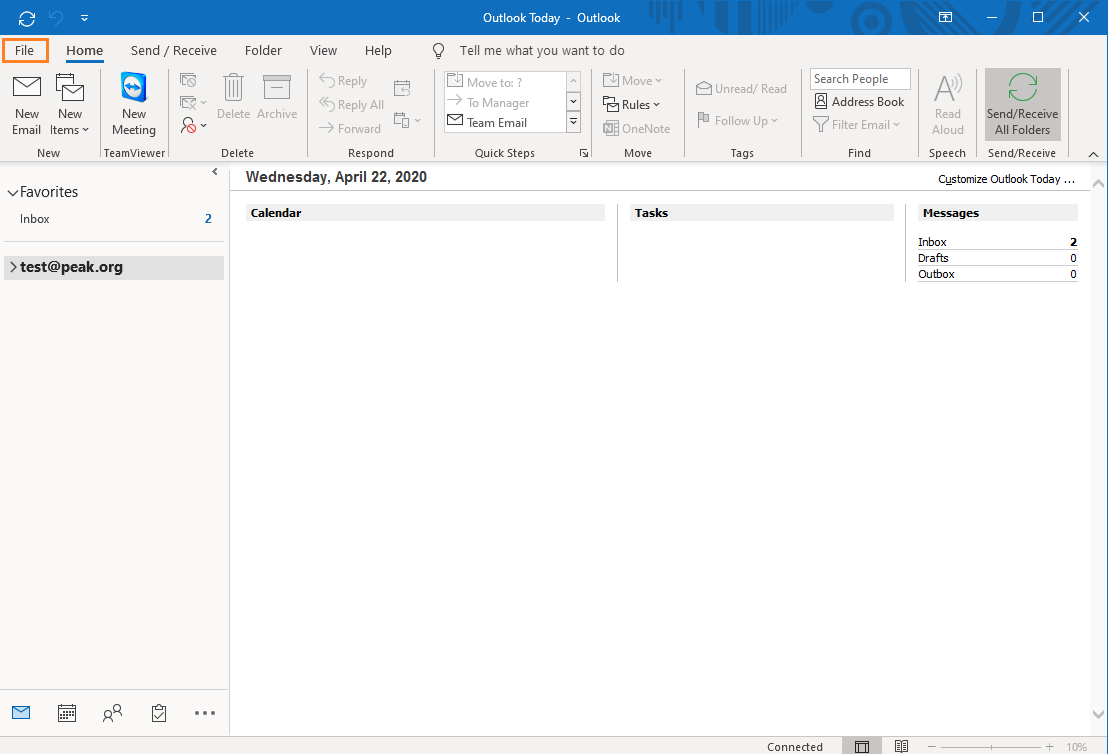
Select File from the toolbar.
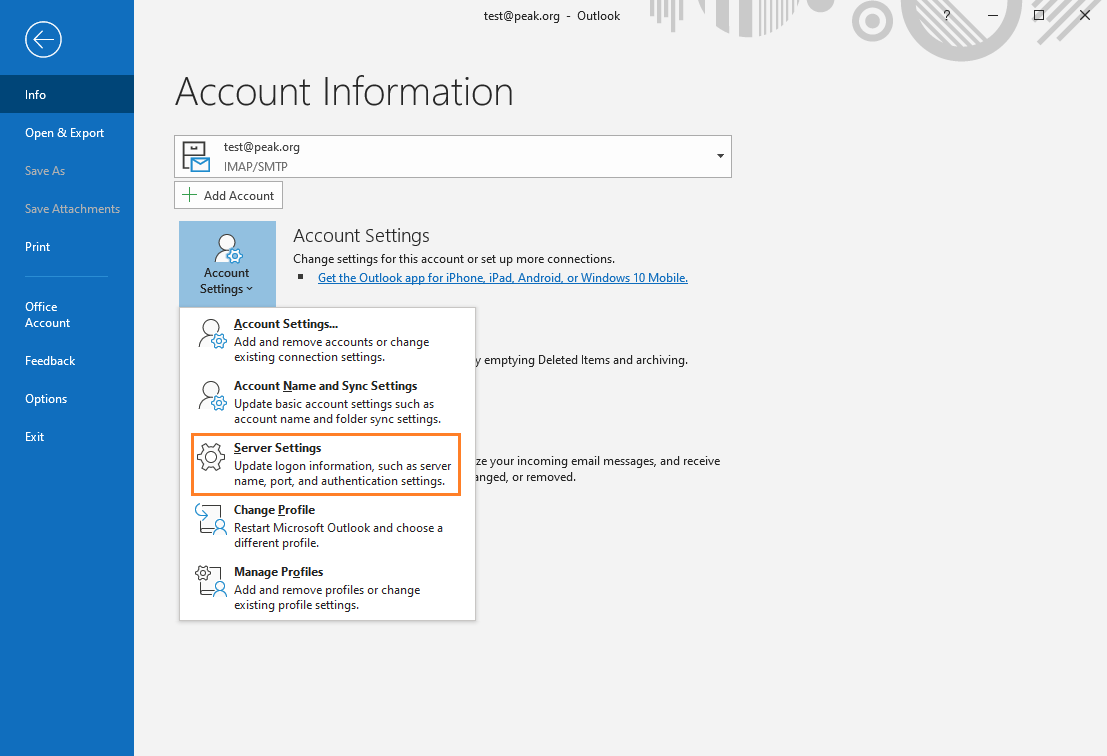
Click the Account Settings button to reveal Server Settings from the drop-down list.
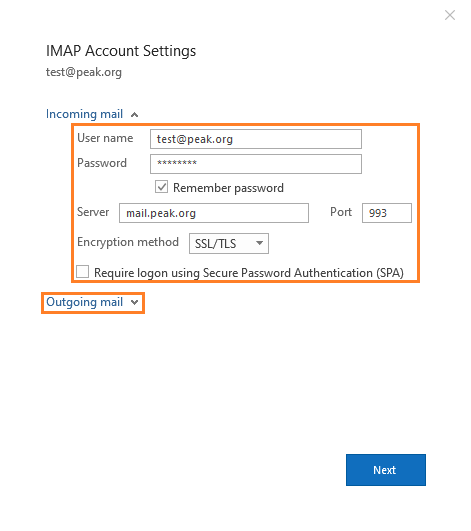
Update the following fields:
User Name: Your entire address
Server: mail.peak.org
Port: 993
Encryption Method: SSL/TLS
Click Outgoing mail to reveal the outgoing settings.

Do not switch from POP to IMAP without backing up your email. If you want to make this change, call our Technical Support for help.
Update the following fields:
Server: mail.peak.org
Port:
IMAP: 587 (or 465 with SSL as the Encryption Method.)
POP: 995
Encryption Method: STARTTLS
Select the Use same settings as my incoming mail server option.
Click the Next button
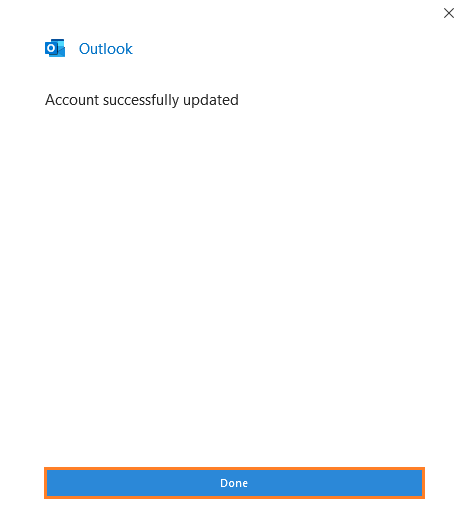
Once Outlook has tested and passed your settings, you’re good to go!
Windows Mail Settings
Click the cog at the bottom of the page.
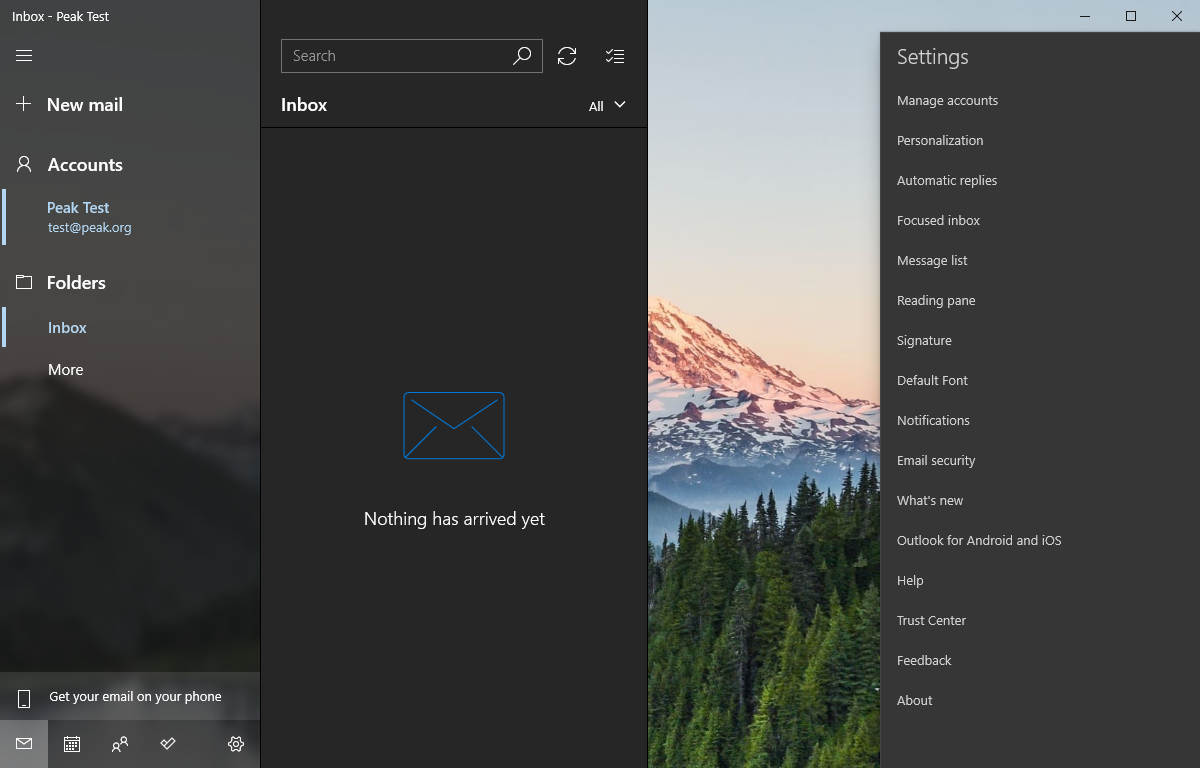
Click the Manage accounts button.
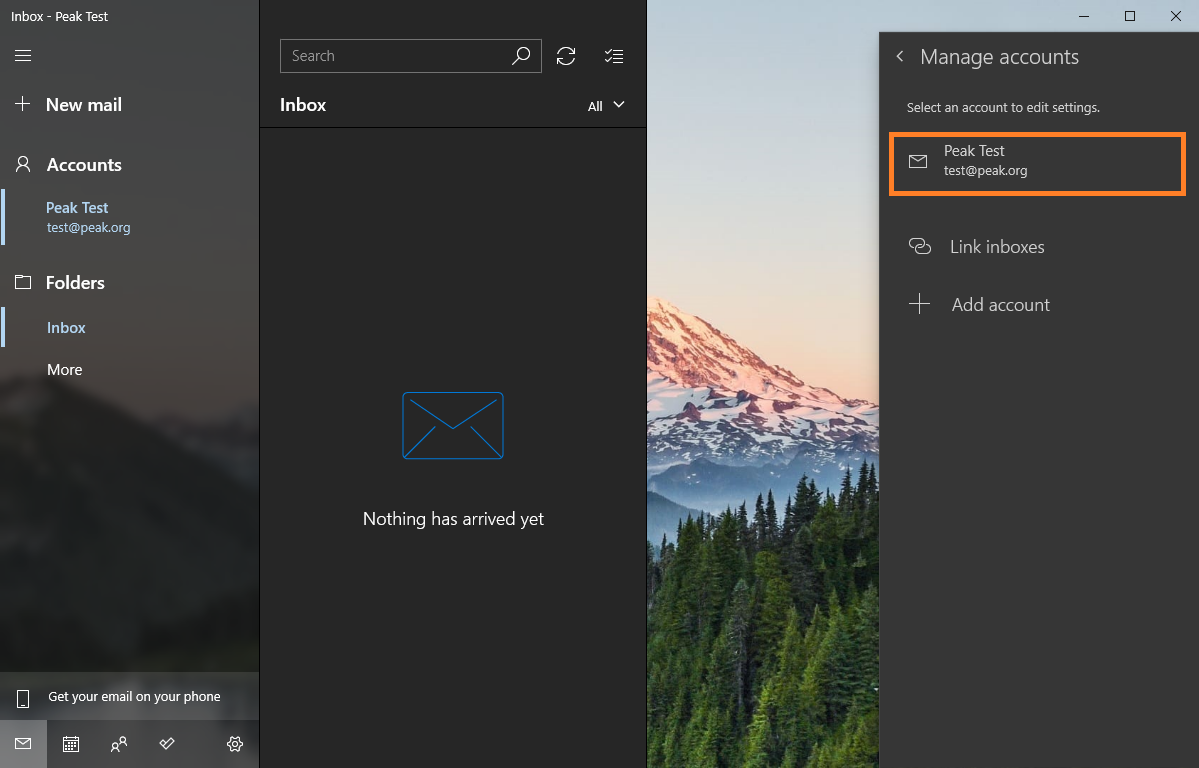
Select the email account you wish to update.
Select Change mailbox sync settings.
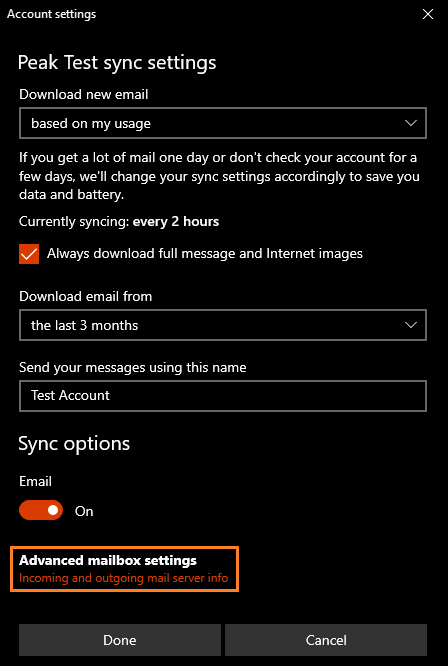
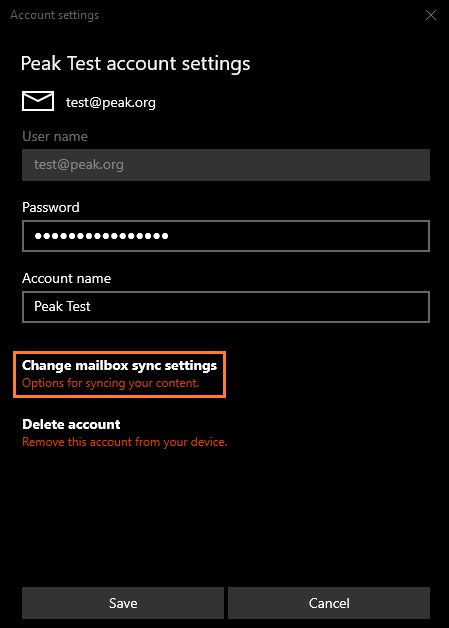
Click Advanced mailbox settings to edit the account settings.
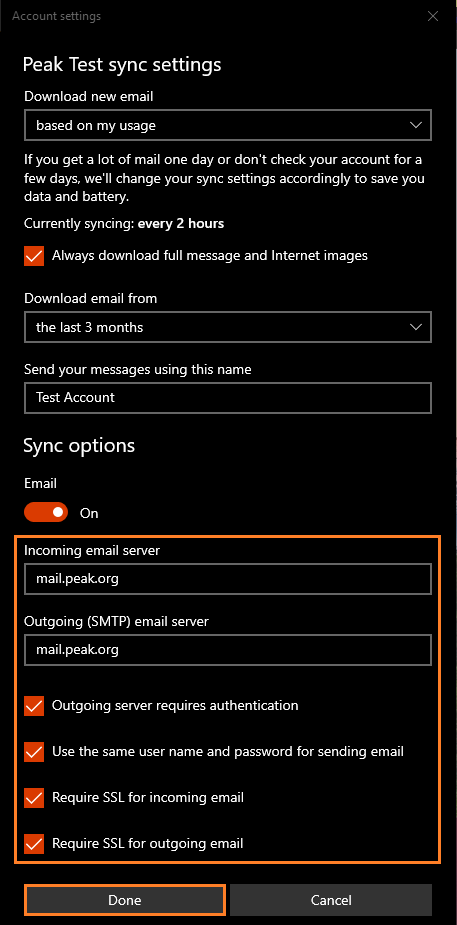
Do not switch from POP to IMAP without backing up your email. If you want to make this change, call our Technical Support for help
Update the following fields:
Outgoing (SMTP) email Server: mail.peak.org
Check the boxes next to the following options:
Use the same user name and password for sending email
Require SSL for outgoing email
Click the Done button.
Apple Mail
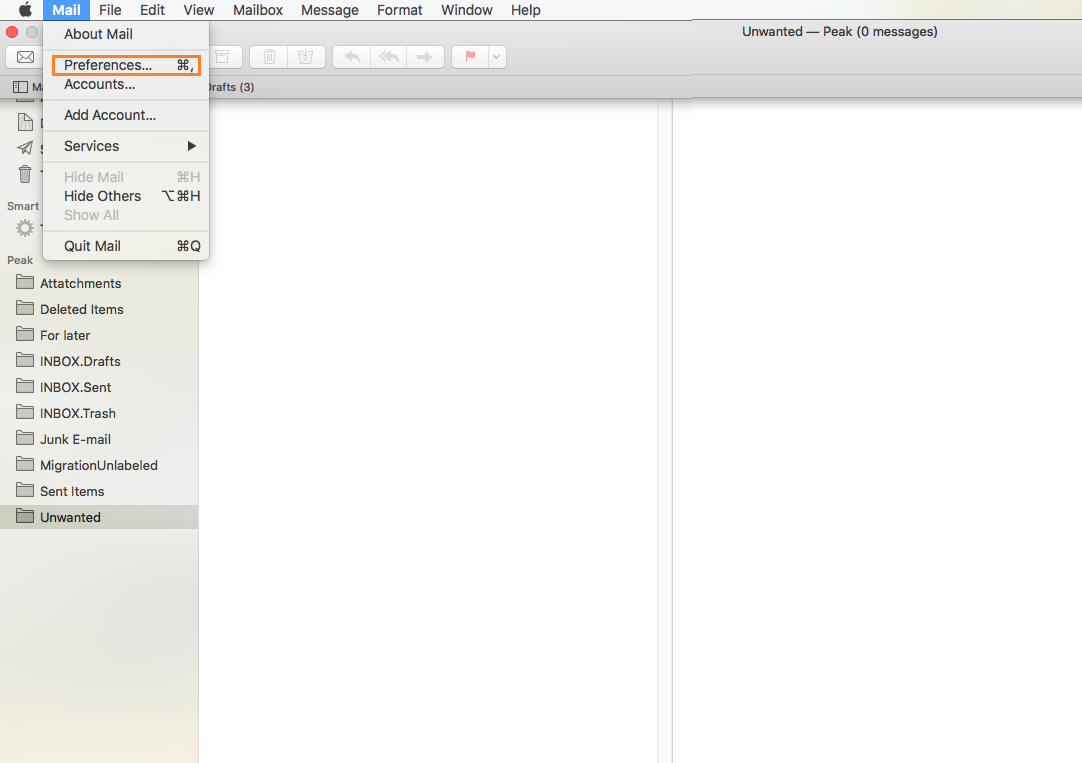
Open the Mail menu and select Preferences.
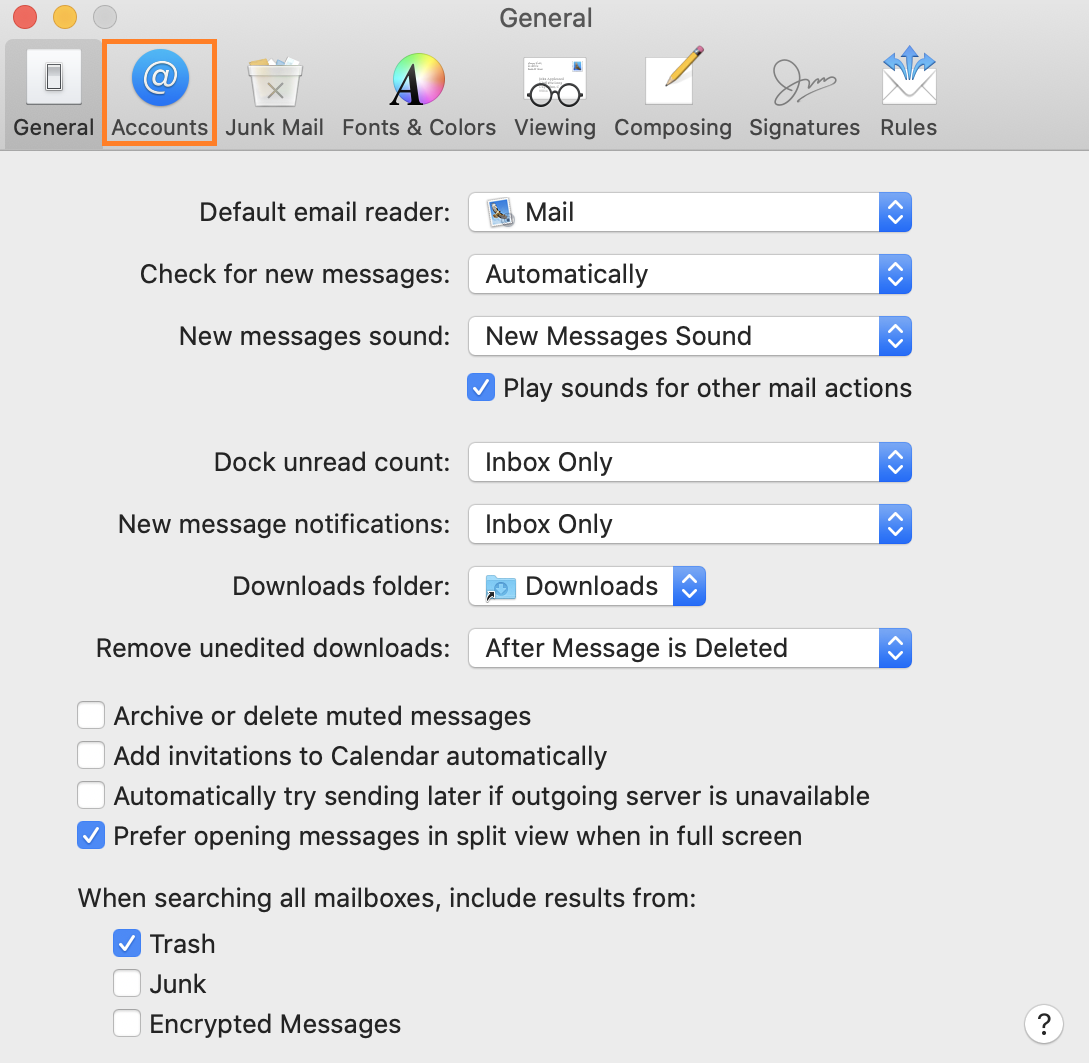
On the Preferences window, select Accounts.
Select the Peak account you want to look at, and click the Server Settings option.

Do not switch from POP to IMAP without backing up your email. If you want to make this change, call our Technical Support for help
Your settings should be the following:
DO NOT check the Automatically manage connection settings boxes.
Incoming Mail Server (IMAP)
User Name: Your email address
Host Name: mail.peak.org
Incoming Mail Server (POP)
User Name: Your full email address
Host Name: mail.peak.org
Outgoing Mail Server (SMTP)
User Name: Your full email address
Host Name: mail.peak.org
Selecting a Mail Protocol
Selecting an email protocol is largely based on personal preference and application and determines how your email program or device handles your email.
POP3 or Post Office Protocol will only download new emails which have been received since you last checked. Typically, this will also delete those emails from the server, so the only copy left is stored on your device, but this can be changed.
IMAP or Internet Message Access Protocol is ideal for situations where multiple devices are checking the same inbox. This protocol keeps email on the server,
POP
Pro
- ‘Unlimited’ storage capacity on your local machine
- Easy to use
Con
- Emails are stored only in one place
- Messages can be split across multiple devices
IMAP
Pro
- Manage your email across multiple devices
- Messages stored on server are easier to recover if devices fail
Con
- Can run into issues with storage capacity on the server if messages are no properly managed
- More bandwidth intensive (if you are on a data plan, this could eat up your usage)
Hopefully this will help you determine which email protocol you want to use. If you choose to switch between POP and IMAP, back your email up first!
Pitfalls of Forwarding Mail (Email Forwarding)
This article is not about forwarding an email you have received to your friends, this is about setting up a forwarder in your inbox that automatically forwards all email from one inbox to another. This type of forward is a lot like forwarding your postal mail.
Spam is detected a number of ways – the spam filter checks the message content, the subject and the email’s header information. The header information is where we get into trouble.
The SPF check may fail – if the sending server doesn’t match the sending email address, it is up to the spam filter to determine how it is handled.
The DMARC check may fail – this is a policy set by the owner of the domain that dictates how a message that fails SPF or DKIM checks are handled.
Remember that this email has already been through one spam filter on the forwarding address side, it now gets to clear the spam filter on the other side – by the email server it was forwarded to.
Forwarded emails need to clear these obstacles, and it can be a challenging course to follow.
Another hangup is how a user (or other users) on the mail server handle their forwarded mail. Even if an email gets through these obstacles, if someone on the recipient server flags one-too-many of these emails as spam, the Spam Filter may flag the forwarding domain, and dispose of all emails sent by the forwarding email server – and this can affect anyone sending from that origination point.
If you are in a situation where you want to forward one email address to another, the best thing to do is use POP protocol to download these emails into the account you want them to be in. Many mail systems, such as Zimbra or GMail have ways of checking external mailboxes for email. Doing this will bypass the spam filter on the receiving end altogether, and your emails won’t have to compete on the Spam Filter obstacle course to get to you.
SPF Failures and your friends
What is SPF?
SPF or Sender Policy Framework is an email protocol that allows the owner of an email domain to tell any recipient that cares which IP addresses legitimate email from their domain can come from.
If the recipient receives an email that indicates it was sent from that domain but originates from another IP, then the recipient is free to discard the message.
As an example: All of our outbound email goes through our spam filters, billing system or our marketing and survey partners.
If a piece of email reports that it was sent by an @peak.org user, but the originating IP address isn’t one of the above locations, the recipient spam filter can discard it.
As mail comes in, credentials are checked to identify the sending domain, the IP address the email was sent from, and any SPF information that is part of the domain’s DNS record. If the sending IP address does not match the IP information from the SPF record, this will cause a failure, and the email will show up in your spam digest.
Emails have failed SPF, now what?
There are a handful of reasons that a piece of email you expected to receive was sent straight to the spam digest for an SPF failure.
The owner of the domain is not staying on top of IP addresses actually in use:
For instance, their normal email may be working fine, but their Contact Us form on their website is actually sending from the web server, and they may have forgotten to add the web server’s IP address. Maybe they made a billing system change and didn’t update their SPF record, and any email being sent is being downgraded by any spam filter that checks SPF.
If you can find someone that matters, please let them know they have this problem so that they can fix it for you and everyone else.
Email Forwarding
If you have mail on a comcast.net email address, and have it forwarded to a peak.org address, any emails being forwarded will show that they are being sent from the IP address of the Comcast mail server.
If an aol.com address emails your comcast.net inbox and the email is then forwarded to your peak.org inbox, but show a sending IP address from the Comcast mail server – because aol.com does not have the IP address from Comcast’s mail server listed as one of the approved sending locations, this will generate an SPF fail.
To work around this, we recommend setting up your inbox to pop emails from another account, so you do not have to go through multiple spam filters.
You have a compelling forgery
It could be that the SPF check is correct, and an email looks legitimate but is not.
How to Identify a Suspicious Email
Scammers will use whatever they can to steal your passwords, account or billing information. One of their favorite tactics is to send phishing emails. Scammers often update their tactics to keep up with the latest news, but the formula is always the same.
You receive an email that is designed to look like it is from a company you know or trust. This can be done by spoofing a from address and making it look like it was sent by info@reputablecompany.com. In reality, it has been sent from a different server entirely. Oftentimes these originating accounts are individuals that have also fallen pretty to some phishing scam in the past. Some mail clients don’t display the sending email address, and you may need to hover over the ‘name’ of the sender to see what the address is.
A scammer can design their phishing email using the company’s layout, colors or logo. They can even base their email off an email that was sent by a reputable company.
All of these phishing scams have the same message, they’re aimed at getting you to act immediately, without thinking of the legitimacy of the request. Here are some examples:
You may receive an email stating it is from your email provider telling you that your account is going to close now unless you follow a link and provide your information to keep it open.
– Remember that your email provider will not ask for your password. They do not need your password to gain access to your inbox.
You may receive an email stating that there was a problem with your billing, and that you need to follow a link to update it.
– Sometimes these emails can be legitimate, so it is best to follow safe practices to determine the legitimacy of an email, or better yet, navigate to the company’s website without following the link in the email, and check it yourself.
You may receive an email telling you that if you act fast, you can get free stuff! The email may provide a coupon code or a ‘secret link’ for you to place your order or tell you that you just need to pay for shipping!
– Pay attention to the spelling of URLs, peakinternet.com is NOT the same as peak-internet.com or peak.internet.com. You can check the destination of a link by hovering your mouse pointer over it, and looking in the lower left-hand corner of the browser window. When in doubt it is always safer to navigate to the site you wish to log in at using a saved bookmark.
Beware of emails that have attachments you are not expecting. An email may refer to an attached invoice, or an attached document that needs to be signed, or an image that needs to be viewed.
– Always be wary of attachments, if you’re not expecting an attachment it is better to not open it. Even if a file appears to be a familiar file type, it can still conceal malicious code.
You are the key participant in your own security. You keep your devices and software up to date, ensuring that any security holes are patched. You choose the anti-virus and anti-malware software on your computer to keep it safe, and you control the links you click and the files you download onto your computer. When trying to determine the legitimacy of an email, try the following steps:
Check the From line.
Remember that this is only part of the story, as the sender and sending address can be spoofed!
Check the content of the email for any of these key signs:
- Does the email have an immediate call to action?
- How is the spelling and grammar of the email? Does it sound fluid and professional?
- Check any links in the email and pay very close attention to the spelling of URLs.
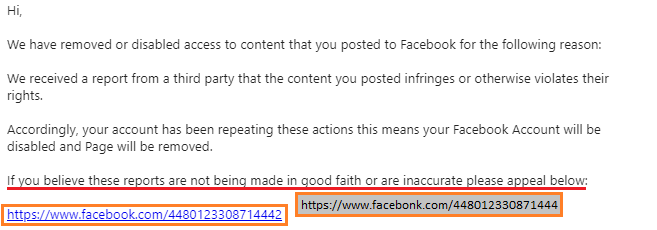
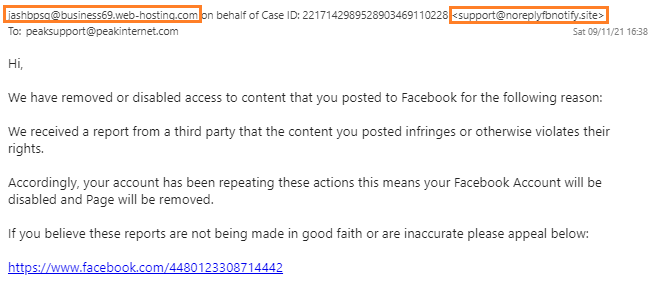
This example shows that the sender isn’t actually from Facebook. While the spelling is good, punitive emails shouldn’t really open with ‘Hi’ as the salutation. The message gives no information about the reported content – if punitive measures had actually been taken, you would have had no way to get information to provide for your appeal. Hovering over the link to the Appeals site shows that the URL isn’t a Facebook domain. This email ticks all the boxes of a Phishing email.
If you do happen to fall for a Phishing scam, the sooner you act, the better off you’ll be.
Change your Password. This is so important because many people reuse passwords. If you’ve provided the password to your email account to an attacker, and you reused that password on your banking account and on your Amazon account you’ve provided the attacker with everything they need to gain access to your email account AND your other accounts where you’ve used the shared password.
Check the filters or rules on your email account and make sure that email isn’t being funneled to an unknown address. Sometimes these rules only have punctuation as a name, to help them hide in plain sight.
Don’t wait until you start to see charges on your credit card or bank account, act as soon as possible to save yourself the hassle of recovery. Contact your bank and change your accounts or contact your credit card company and get a new card, with a new number issued.
If you ever have any questions about the legitimacy of an email, PEAK is always here to take a look or provide you with additional guidance if you need assistance with your device or network security.
How to secure your compromised account
So you’ve been compromised, now what? If you’re a PEAK Email customer, we’re always here to help get your account completely under your control. Once you get control over your email account, you shouldn’t stop there. Follow these tips to make sure your email account stays secure and in your control.
Scan your devices
The devices you check your email on should be scanned for any malware or viruses. Especially, if you don’t know how the email account was compromised. Once your devices have been scanned and are clean, then you can consider logging into your email account again.
Change your email password
This one is easy. Call us, and we can change the password to your email account so that whoever has access, no longer has access. When we detect that an account has been compromised, we automatically disable the account to prevent any further tampering. When looking to create a new password, make sure you choose one that is several characters long and contains numbers, upper and lowercase letters, and at least one symbol. Make sure that it isn’t a password that you use for anything else. This will ensure extra protection for you and your other accounts.
Try to identify the leak
Once you have secured the account, try to identify how your account became compromised. You may have been the victim of a Phishing attempt, and accidentally entered your login information into a malicious login page or form. If you’ve reused passwords from other sites, the attacker may have used this to gain access to your account. You can check if your email address has been associated with any leaks at https://haveibeenpwned.com/ . It may also be possible that your computer is compromised. If you’re not sure, run a good scan and ensure that your computer is free of any nasty malware.
Review your email settings
Login to webmail and make sure that no settings have been changed. Oftentimes we see forwards to unknown emails, changes to the reply-to address, or filters created to move messages to folders or forward specific pieces of email to an outside address.
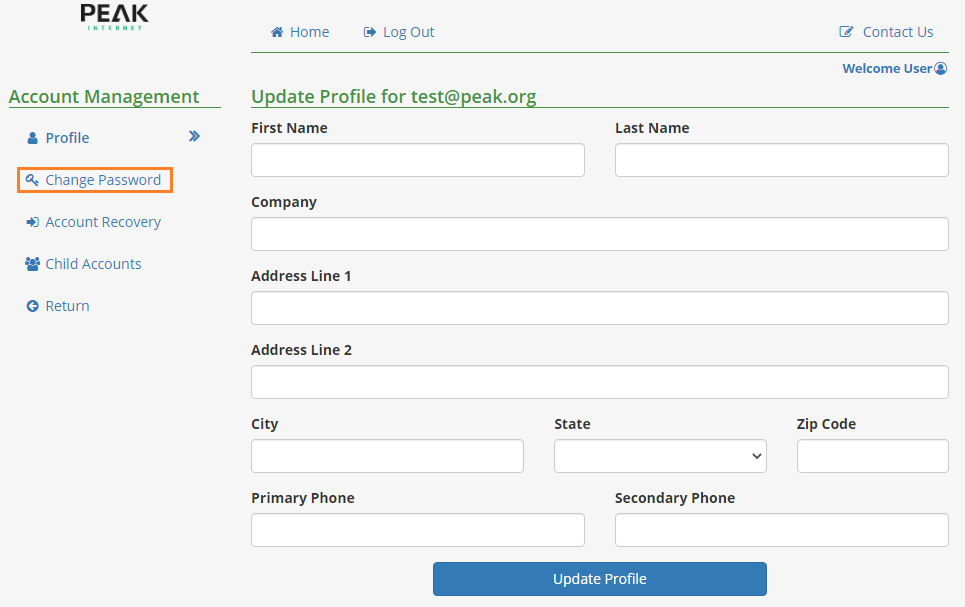
App Portal Introduction
App Portal allows you to manage your own email account, and provides you with additional functionality that is not built into Zimbra. It also uses the same password that Zimbra does.
Launch Zimbra
Click the Email icon to launch Zimbra.

This will launch you into Zimbra.
Change your password
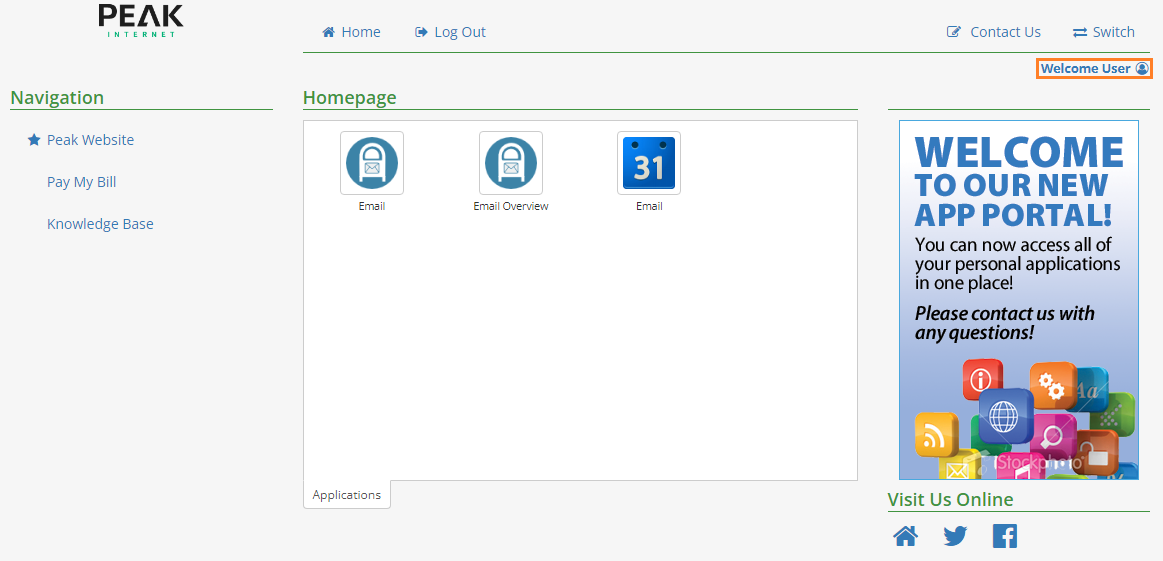
Log into the AppPortal site at https://userportal.peak.org. This will use your current email username and password.
To update your password, click the Welcome Name link in the upper-right corner of the screen.
Select Change Password from the menu on the left.
Fill in the Current Password, New Password, and Confirm New Password fields. Be sure the password you’re using is secure, and if you need help on creating a secure password.
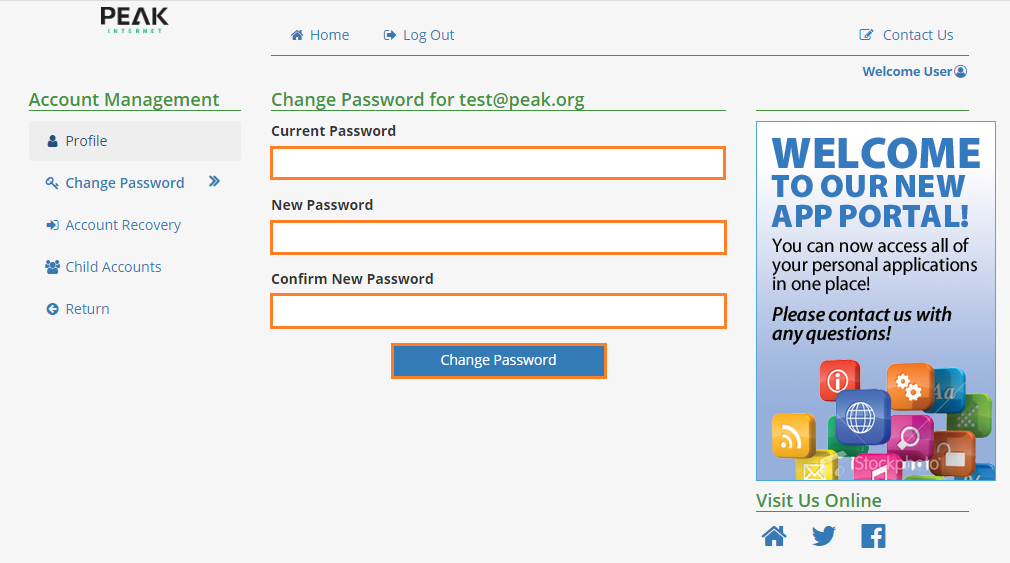
Click the Change Password button when done.
If you do not know your current password, or if you encounter problems, give our support team a call.
Setup Account Recovery
Account Recovery will allow you to gain access to the account without calling us, but we’re always here if you need us!
To set up Account recovery, click the Welcome Name link in the upper-right corner of the screen.
Select Account Recovery from the menu on the left.

There are a number of ways you can set to recover your account:
By Phone Number, if you populate the Phone Number field.
By a secondary email address if you populate the Alternate Email Address field.
By Security Questions if you fill in the Secret Questions fields.
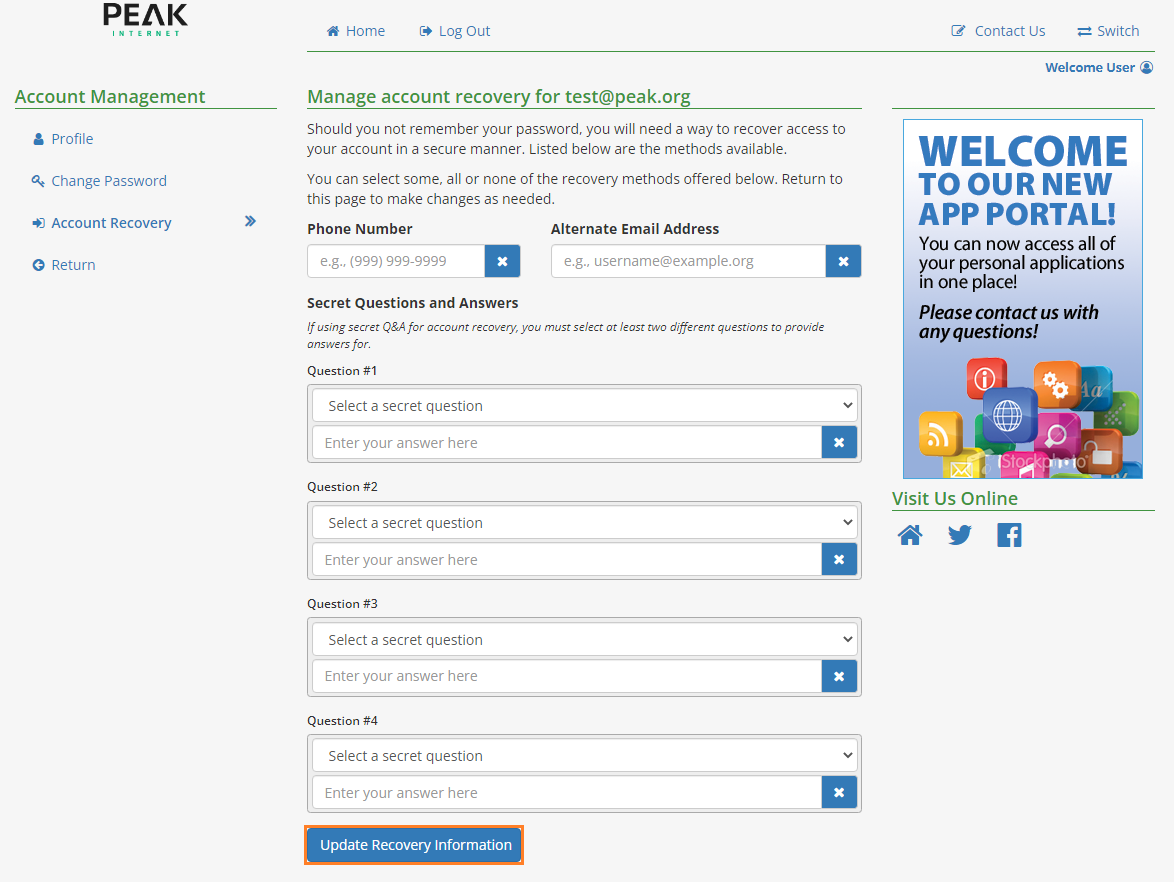
Once you have entered the recovery methods you wish to set up, click the Update Security Information button.
Vade Spam Filter
Most filtering of unsolicited automated email (also known as spam or junk mail) is handled by a spam filter before those email messages reach your Inbox.
Email that might possibly be junk mail, but is not certain to be junk, is placed in your Junk folder. You can review these messages and either move them out of the Junk folder or delete them. If you do not move or delete the messages, they are purged after 30 days.
Some unwanted messages may not be fully categorized as spam and are not placed in the Junk folder (ie. weekly newsletters and advertisements from legitimate companies). The best way to handle unwanted mail from legitimate senders is to unsubscribe from the mailing list.
If you are receiving many unwanted email messages, contact your administrator. Reporting email as spam helps your email administrator to fine-tune spam filtering.
Mark Emails as Spam
Select the message to mark as junk.
On the toolbar, select Spam.

You can also right-click the message and select Mark as Spam.
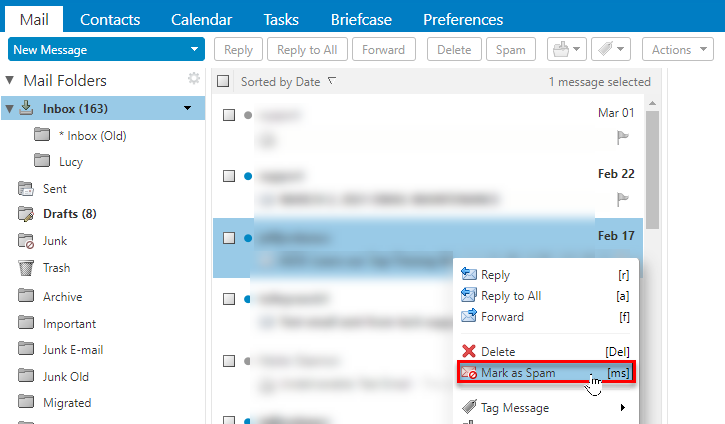
The email is moved to your Junk folder.
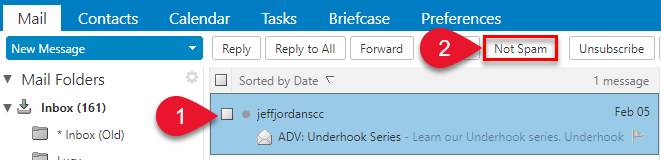
Mark Emails as Not Spam
Sometimes messages that are not junk are placed in the Junk folder. You can move the messages to the appropriate folder in a number of ways: Drag the message to another folder, Select message and click Not Spam, or Right-clicking the message and selecting Mark as Not Spam.
Drag the message to another folder.
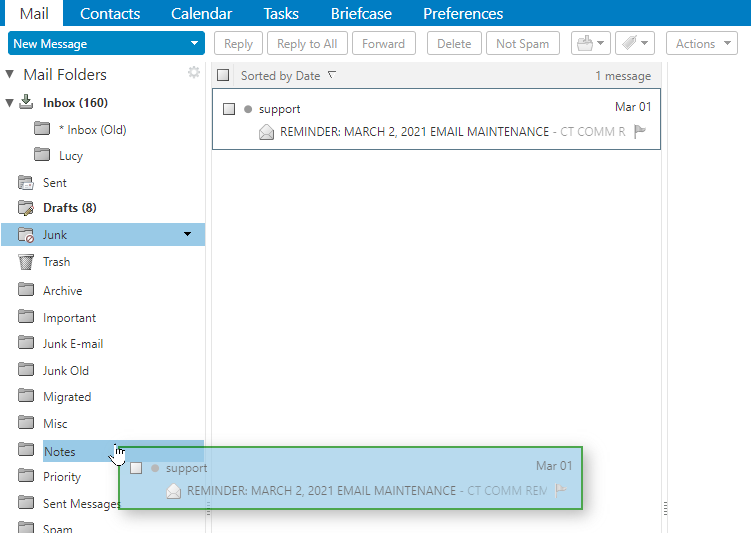
Select the message and click Not Spam on the tool bar
Right-click the message and select Mark as Not Spam. The selected message moves to your Inbox.
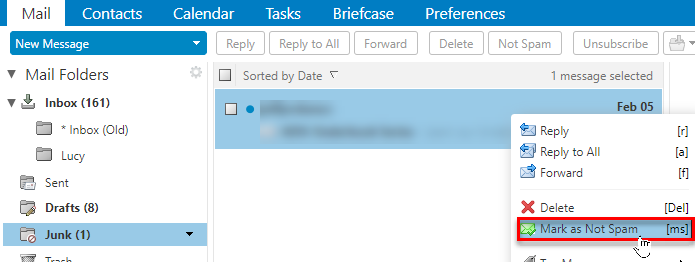
A confirmation message appears at the top relaying the number of messages marked as not spam.
![]()
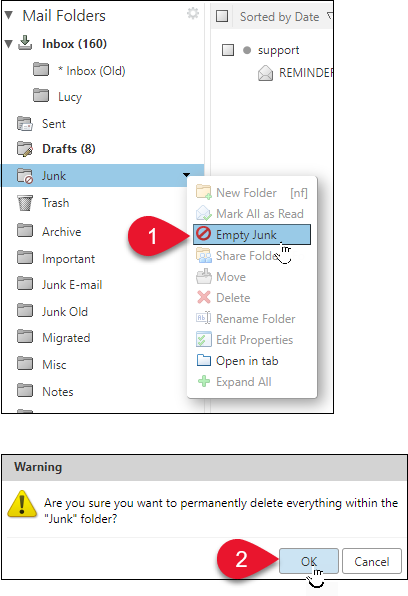
Empty the Junk Folder
The contents of the Junk folder are automatically purged after an administration-configured number of days. You can empty your Junk folder any time.
Right-click the Junk folder and select Empty Junk.
Click OK.
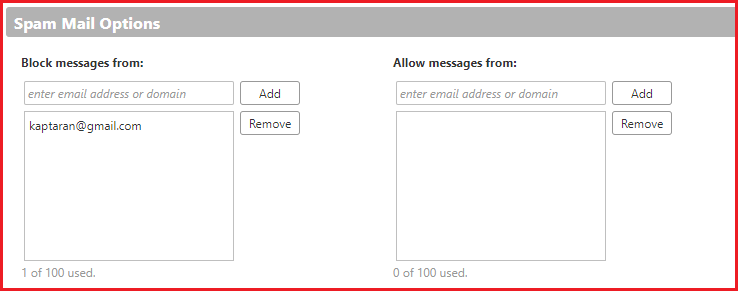
Spam Mail Options
If you notice that certain email addresses are always being incorrectly added to your Inbox or Junk folder, you can identify those addresses to block or not block.
Go to the Preferences > Mail page.
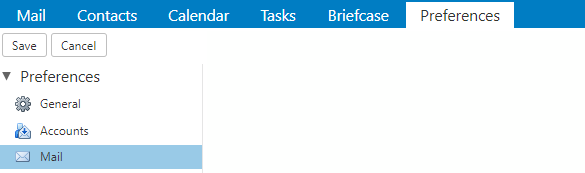
Scroll to the Spam Mail Options section.
In the Block messages from text box, enter email addresses that should always be treated as junk. You can list up to 100 addresses.
If you wish to blacklist a whole email domain, enter in the domain.ext in the textbox. (eg, for spam@spammail.com, you would enter spammail.com)
In the Allow messages from text box, enter email addresses you trust that for some reason end up in your Junk folder, such as newsletters you subscribe to. Messages from these email addresses are never blocked. You can list up to 1000 addresses.
Click Save.
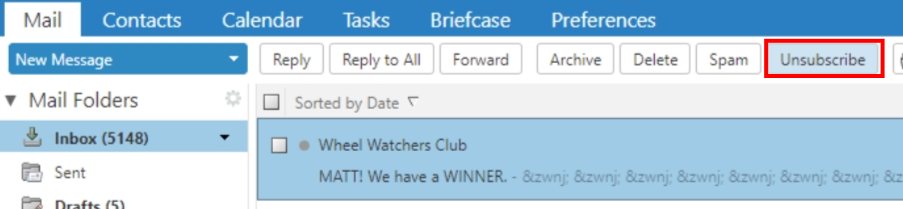
Using the Unsubscribe Button
A message with the correct unsubscribe information that is not in the Junk folder will display an unsubscribe button in the action bar of the webmail interface.
Selecting the button will present a small banner notification above the menu bar indicating unsubscribe has been requested.
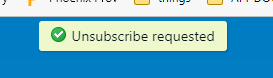
Only one message can be unsubscribed from at a time. When unsubscribe is requested, the server initiates the call to the unsubscribe information from the sender, so there is no danger from the customer opening the message and visiting a third party site.
This feature is only available in the “Advanced (AJAX)” webmail view.
Mailman How-To
The list software we use is Mailman. It is very powerful, but still easy to use, and offers an overwhelming number of configuration options. Fortunately, only a few are significant for most users.
Reply to Sender
Most lists are configured in one of two ways:
Reply to List – The ‘from’ address is the address of the list, and hitting Reply will allow them to participate in the list discussion. The disadvantage
Reply to Sender – For lists like this, the ‘reply to’ field is populated with the sender’s direct email address, and the reply button will reply directly to the sender of the email. Replies can still be sent to the group using the reply all function.
When deciding which setting you want to use, have your list members in mind. The disadvantage of a Reply to List is that someone may think they’re responding directly to the sender but they reply to everyone with content that may be compromising or embarrassing. Selecting Reply to Sender allows you to avoid this potential issue. The main disadvantage of this method is that recipient mail servers may fail an SPF check. To get around this, subscribers will need to whitelist the servers they subscribe to.
Moderated List
By default, all lists are set up to be moderated. This means that when a list member sends a message to the list, it needs to be approved before it gets sent out. If the list is only for one or two people to send announcements or newsletters, you will want it to stay this way.
If you intend your list to be more of a discussion, then you will want to turn off moderation, but we highly recommend at least starting your list off moderated for a few posting cycles, while people get used to being a member of a mailing list.
To change this setting in Mailman, you will have to navigate through the menus:
Privacy Options → Sender Filters →
The first option By Default, should new list members be moderated? – This is the setting you want.
To require postings to be reviewed, select Yes.
For free-flowing discussion, select No.
You can also choose to moderate list members individually, if you have someone you want to review their posts by the following option:
Membership Management/Membership List
Check the Mod box.
If you’re planning to populate your list with a large number of addresses, start with a couple dozen, especially if they’re not expecting to be subscribed. Ramp up carefully as you start to get a feel for running a list – this will help you alleviate problems while they’re small and prevent them from turning into a nightmare.
Review your settings from time to time, and ensure that your list is working the way you want it to. As you gain familiarity, many of the setting options will make sense.
If you’re looking for additional information or the official documentation, see the Mailman List Administration Manual.
